Follow Me on Pinterest

Followers

Click to view my photography blog

Click to view my photography blog
Cliccare per vedere il mio blog di fotografia

IMPORTANT ---- DOWNLOADS

To download my FREE printables from 4 Shared you must either have a 4Shared account or register on the site (this is free) . This is the only way you can download my freebies saved in 4 Shared.


Per scaricare GRATIS i miei progetti salvati su 4Shared dovete avere un account con 4 Shared o registrare sul sito,( questo si fa gratis) . Questo è l'unico modo per scaricare i miei Freebies.

Thursday 30 December 2010

A new journey..... Nuovo viaggio

Here we go again, it's almost here...
we're starting a new journey that will last 365 days.
My wish for your trip on highway 2011 is
that it will be full of joy, good health, love and serenity all the way.
Happy New Year!

Eccoci di nuovo, è vicino...
stiamo per iniziare un nuovo viaggio che durerà 365 giorni.
Il mio augurio per il viaggio che affronterete nell'autostrada 2011 è
che sia pieno di goia, buona salute, amore e serenità per tutto il percorso.
Buon viaggio... Buon Anno!


Tuesday 21 December 2010

gif animation maker
Luke 2:7 and she gave birth to her firstborn, a son. She wrapped him in cloths and placed him in a manger, because there was no room for them in the inn....... Luca 2:7 ed ella diè alla luce il suo figliuolo primogenito, e lo fasciò, e lo pose a giacere in una mangiatoia, perché non v’era posto per loro nell’albergo.


I will be away from my blog for a while so here are my wishes for all my blog followers.
Sarò assente dal blog per un po' perciò ecco i miei auguri per tutti i miei lettori.

A Blessed Christmas
And
A Happy New Year to all !

Un Santo Natale
e
Un Felice Anno Nuovo a tutti !


Saturday 18 December 2010

Free 2011 Desk Calendar and Pocket Calendar


Desk Calendar ... Calendario da tavolo


Pocket calendar .... Calendario tascabile

This post has been in draft for 6 days and now I think it is about time to post it on my blog as I will very probably have to stay away from my computer for sometime. This is also the last freebie for this year that's nearly over.I hope you've enjoyed all the freebies I have offered throughout this year 2010.

Last Christmas my gift for all my blog followers was a printable perpetual calendar which seems to have been greatly appreciated and which is still being downloaded to this present day. It is time for calendars so please bear with me if I am offering another printable calendar for you this Christmas. The only difference is that, this time, I thought of a small 2011 desk calendar for you as well as a pocket 2011 calendar.
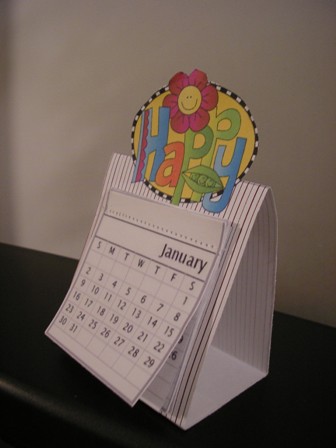
To make the desk calendar you need to download the page with the 12 months, cut out each month around the grey borders, arrange them in order and with a sewing machine sew them together as in picture A.
Next step, download and print out the page with the calendar stands, choose the one you prefer and cut out. Next cut around the upper part of the graphic to make it stand up once folded as in picture B.
DO NOT CUT BELOW THE FOLDING LINE.
Fold along the lines and glue the narrow shaded part to the base. Once the stand has been cut and assembled all you must do is glue the calendar onto the stand in the square white space.

Cut out the months ..... Tagliate i mesi


I recommend using card stock for the stand for a sturdy support. You can also cover the stand with transparent adhesive contact film to give it a glossy look, in this case you should cover the template with the contact film before proceeding with the folding and cutting.

For the pocket calendar you will need to download the page with the 12 months, cut out each month around the grey borders, arrange them in order and sew them together with a sewing machine just as for the desk calendar.
Next, download and print the page with the pocket calendar covers, choose and cut out the one you prefer and fold as in picture C.
I suggest you use card stock for the covers , you can also cover the template with transparent adhesive contact film for a glossy cover.
Place the sewn calendar inside the cover and glue to the inside. See picture C.
Yes I know there is alot of cutting and folding to do but I hope you will appreciate these calendars as much as last years perpetual calendar.

To download Calendar 2011 ( 12 months) click here.
To download the templates for the Desk Calendar Stands click here.
(This is a zip file with 6 different stands)
To download the templates for the 3 Pocket Calendar Covers click here.


Questo post è stato in bozze per 6 giorni e adesso è ora che lo pubblico perchè dovro stare lontana dal mio blog per un po' di tempo. Questo è l'ultimo freebie per quest'anno che è quasi finito.Spero che tutti i miei progetti stampabili per l'anno 2010 vi sono piacute.

Lo scorso Natale il mio regalo per tutti i miei lettori è stato un calendario perpetuo che sembra essere stato molto apprezzato e che è ancora scaricato fino a questo giorno. E 'tempo per i calendari quindi per favore abbiate pazienza se vi offro un altro calendario stampabile per questo Natale. L'unica differenza è che, questa volta, ho pensato ad un piccolo calendario da tavolo 2011 e anche ad un calendario tascabile 2011.
Per avere il calendario da tavolo è necessario scaricare la pagina con i 12 mesi. Tagliate ogni mese tagliando intorno ai bordi grigi, disporli in ordine e con una macchina da cucire cuciteli insieme, come nella figura A.
Il prossimo passo, scaricare e stampare la pagina con il supporto per il calendario , scegliere quello che preferite e ritagliare.

Adesso tagliate intorno alla parte superiore del grafico per farlo risaltare una volta piegato come in figura B.
Piegate lungo le linee e incollate la parte ombreggiata, in basso, alla base. Una volta che lo stand è stato tagliato e assemblato tutto quello che dovete fare è incollare il calendario sul supporto nello spazio quadrato bianco.


Vi consiglio di utilizzare cartoncini per lo stand per un supporto robusto. Si può anche coprire lo stand con della pellicola trasparente adesiva per dare un aspetto lucido, in questo caso si dovrebbe coprire il modello con la pellicola prima di procedere con la piegatura e taglio.

Per il calendario tascabile sarà necessario scaricare la pagina con i 12 mesi, tagliate ogni mese tagliando intorno ai bordi grigi, metteteli in ordine e cucite insieme con una macchina da cucire come per il calendario da tavolo.
Quindi, scaricare e stampare la pagina con le copertine per il calendario tascabile, scegliere e tagliare quello che preferite e piegate come in figura C.
Vi suggerisco di usare cartoncino per le copertine, è possibile coprire anche il modello con la pellicola trasparente adesiva per una copertina patinata.
Posizionare il calendario all'interno della copertina e incollate all'interno. Vedi foto C.
Sì, so che c'è un sacco di taglio e piega da fare, ma spero che apprezzerete questi calendari, come per il calendario perpetuo dell'anno scorso.


Per scaricare il Calendario 2011( 12 mesi in Versione Italiana) cliccate qui.
Per scaricare il template per il supporto del Calendario da tavola cliccate qui.
( Questo è un file in formato zip con 6 supporti diversi)
Per scaricare il template delle 3 copertine per il calendario tascabile cliccate qui.

Friday 17 December 2010

Weekend Shadows


This is the shadow on the wall cast by some branches from our Christmas tree. The christmas lights give a nice effect.
Happy weekend!

Questa è l'ombra , proiettata sul muro, dei rami del nostro albero di Natale. Le luci danno un bel effetto.
Buon weekend!

Friday 10 December 2010

Weekend Shadows


I haven't much to say about this picture. Few shadows I'm afraid! I chose to continue with the Christmas theme.
Enjoy your weekend!

Non ho molto da dire su questa foto. Ci sono poche ombre! Ho scelto di continuare con il tema natalizio.
Buon weekend a tutti !

Thursday 9 December 2010

Paw prints on the floor --- Impronte di gatto

I am sure you all remember Disney's Cinderella and if you do then you all know who Lucifer was... yes, the spiteful family cat.
Now try and remember the scene where Cinderella sings Sweet Nightingale, towards the end Lucifer runs around leaving his dirty paw prints on the freshly polished floor.
This is exactly what Toddy did this morning. The naughty little thing sneaked in my sitting/dining room just as I had finished waxing the marble floor... uuuuuuuuuuh , polishing the floor is one of the things I hate most and you can imagine how furious I was with him. He left his paw prints almost everywhere on the wet floor and whatmore the wet wax naturally stuck to his paws... stupid kitty. I wanted to cry but in the end I couldn't help but laugh over the incident when I saw him hide under the armchair.


Sono sicura che tutti ricorderete Cenerentola di Disney e allora ricorderete anche chi era Lucifero... sì il gatto dispettoso della famiglia. Adesso pensate alla scena dove Cenerentola canta "Canta Usignol", verso la fine, il gattaccio si diverte a sporcare il pavimento appena pulito lasciando le sue impronte impolverate dappertutto.
Questo è esattamente quello che Toddy ha fatto questa mattina. Il birichino è entrato di nascosto nel salone appena avevo dato la cera.... uuuuuuuuu, pulire i pavimenti è una delle cose che odio fare e potete immaginare com'ero furiosa. Ha lasciato le sue impronte quasi ovunque sulla cera fresca e per dipiù, la cera ancora bagnata naturalmente, si è attaccata alle sue zampe... stupido gatto. Altro che cantare avevo voglia di piangere ma alla fine mi sono fatta una risata quando l'ho visto nascondersi sotto la poltrona.

Tuesday 7 December 2010

Vintage Name Place Cards


Here are some more name place cards that I made. These are in Vintage style for a more classic Christmas Dinner table. The picture above shows only one of the 3 graphics I chose for this group, you can see all three just below this post.
To download the Vintage angel card click here.
To download the Vintage Santa card click here.
To download the Vintage (Girl ) Christmas card click here.

All files are in zip format and each file has a page with 3 cards and a page with folding and cutting instructions.

Ecco il nuovo gruppo di segna posto che ho appena finito. Questi sono in stile Vintage per una tavola di Natale più classica. La foto sopra dimostra solo uno dei 3 segna posto che ho creato, potete vedere tutti tre sotto questo post.
Per scaricare il segna posto con la ragazza vintage, cluccate qui.
Tutti i file sono in formato zip. Ogni file contiene una pagina con 3 segnaposti ed una pagina con istruzioni in Inglese.


Click on the picture to enlarge ------ Cliccate sopra l'immagine per ingrandire


Friday 3 December 2010

Weekend Shadows


To keep in theme with the Christmas Spirit here is my latest weekend shadow picture. This angel makes part of my angel collection . I hope to post  more shadow pictures linked to the Christmas theme in the following weekends.
  Happy weekend!

Per restare in tema con lo spirito natalizio ecco la mia ultima foto  per il weekend. Questo angelo fa parte della mia collezione di angeli. Spero di fare altre foto con il tema natalizio per i prossimi finesettimana.
  Buon weekend!

Wednesday 1 December 2010

Santa and Snowman Name Place Cards


Here I am, as I promised, with my latest free printable name place cards for this Christmas, I hope you like them. You can download the Santa cards here. It is a zipped file in which you will find two different versions, it is always the same Santa but the backgrounds are different. I also included a sheet with the cutting and folding instructions.
To download the snowman card click here. This is also a zipped file and I included the cutting and folding instructions here too.
Below you can see a sample diagram of the templates.

Eccomi, come promesso, con le nuove "printables" per questo Natale, spero che vi piaccono. Per scaricare il segna posto con babbo natale cliccate qui. Questo è un file zippato dove troverete due versioni, sempre con lo stesso babbo ma con due sfondi diversi. Troverete anche un foglio con istruzioni in Inglese.
Per le amiche Italiane ecco la spiegazione:
Tagliate il modello, scrivete subito il nome nello spazio, tagliate intorno alle teste , (seguendo il foglio delle indicazioni, troverete dei puntini intorno alla sagoma dove dovete tagliare ) piegate ed incollate la linguetta, in basso, alla base come indicata nel foglio delle indicazioni.


LinkWithin

Related Posts with Thumbnails