 |
| That means Sunday 1st April..............Questo significa Domenica 1° Aprile |

Click to view my photography blog

Cliccare per vedere il mio blog di fotografia
Wednesday 28 March 2012
Easter Mobile Ornament - Addobbo Pasquale


This is a last minute Easter ornament which is quick and easy to make.
All you need are 3 sheets of card stock printing paper size A4.
A pair of scissors, some cotton or nylon thread.
Stick glue.
Print out the templates :
Download Page 1 Here
Download Page 2 Here
Cut out the outer rings and the inner circles, 2 of each.
First punch the holes , this will help you to find the right position for the templates when you have to glue the backs together. The holes must match.
Glue the backs of the inner circles and then glue the backs of the outer rings .
Next pass a piece of cotton thread through the lower hole that is on the ring and through the only hole on the inner circle, this is a tricky part so you must be careful to position the inner circle as central as possibe, leaving an equal space all around from the outer ring. When you think you have the right position tie the cotton ends into a knot.
Finally cut a longer piece of thread and pass it through the upper hole on the ring and tie the ends into a knot.
Now you can hang your Easter Mobile Ornament.

Questo addobbo Pasquale è veloce e facile da fare.
Tutto ciò che serve sono 3 fogli di cartoncino formato A4, per stampante.
Un paio di forbici , filo di cotone o di nylon.
Colla stick.
Stampate i modelli :
Stampate i modelli :
Scaricate Pagina 1 Qui
Scaricate Pagina 2 Qui
Tagliare gli anelli esterni e cerchi interni, 2 di ciascuno.
Tagliare gli anelli esterni e cerchi interni, 2 di ciascuno.
Prima fate i buchi, questo vi aiuterà a trovare la giusta posizione per i modelli quando si devono incollare insieme. I fori devono combaciare.
Incollate il dorso dei cerchi interni insieme e poi incollate il dorso degli anelli esterni.
Passate un pezzo di filo di cotone attraverso il foro inferiore che è sul anello esterno e attraverso l'unico foro sul cerchio interno, questa è la parte difficile quindi è necessario fare attenzione a posizionare il cerchio interno al centro il più possibe, lasciando intorno uno spazio uguale dall'anello esterno. Quando pensate di avere la posizione giusta legate il cotone in un nodo.
Infine tagliate un pezzo di filo più lungo e fatelo passare attraverso il foro superiore sull'anello e legate le estremità in un nodo.
Ora è possibile appendere il vostro addobbo Pasquale.
Monday 26 March 2012
Spring in a sad garden - Primavera in un giardino triste.
The garden that surrounds the block of flats I live in is not one of those beautiful gardens where lots of colourful flowers grow but simply a sad garden with nearly no flowers at all and only a few trees and bushes, nevertheless Spring has arrived in our garden as in all the others and by no doubt left it's delicate and magical touch.
I took these pictures from my first floor window and had to zoom in , so that explains why they don't look so good .


I took these pictures from my first floor window and had to zoom in , so that explains why they don't look so good .
Il giardino che circonda la palazzina dove vivo non è uno di quei bei giardini dove crescono tanti fiori colorati ma un giardino semplice e triste, quasi privo di fiori con soltanto alcuni alberi e qualche cespuglio, ma intanto la primavera è arrivata anche nel nostro giardino come in tutti gli altri e senza dubbio ha lasciato il suo tocco magico e delicato.
Ho scattato le foto da una delle mie finestre sul primo piano e ho zoomato, questo spiegha perchè le foto non sono molto nitidi.


Friday 23 March 2012
Spring Mobile Instructions - Istruzioni per Addobbo Primaverile.

I have been asked to write out the instructions for my Spring Mobile which you can see in my previous post, so I made a pdf file which you can download from Mediafire, here.
It is a large file becauise apart from the instructions it includes a few diagrams, a pattern and a couple of photos too.
Mi è stato chiesto di pubblicare il modello e le indicazioni per fare l'addobbo primaverile che potete vedere nel
E' un file grosso perchè ci sono anche dei disegni, un modello e un paio di foto.
Ho dovuto usare il traduttore Google per la traduzione dall'inglese, perciò vi prego di scusare il mio Italiano.Grazie!
Wednesday 21 March 2012
Spring Mobile - Addobbo (Mobile) per Primavera

I made this mobile to welcome the onset of Spring. I had a hard time taking the pictures because the ladybugs and the flowers kept swirling around ... well that is why it's called a mobile !
Download instructions here (pdf file)
Ho fatto questo addobbo (mobile) per dare il benvenuto alla Primavera.
Ho tribolato per fare le foto perche le coccinelle e i fiori continuavano a girare su se stesse ... eh beh, si chiama "mobile" per questo !
Scaricare le istruzioni qui (pdf file)


Tuesday 20 March 2012
Taking a decision - Prendere una decisione
I finally decided I must definitely loose some weight but since I know for sure I will never stick to a strict diet I've convinced myself to start out by slowly eliminating a few foods gradually. I am starting with banning cheese and all sweet foods (cakes, candies, chocolate, etc.,) for the moment.
My daughter lost 3 Kilos in a month by just eliminating all the sweet stuff ... I hope it will work for me too, wish me luck!
Just to keep on the weight subject, here's a cartoon I found that made me smile.
My daughter lost 3 Kilos in a month by just eliminating all the sweet stuff ... I hope it will work for me too, wish me luck!
Just to keep on the weight subject, here's a cartoon I found that made me smile.
Ho finalmente deciso che devo assolutamente perdere peso ma sapendo per certo che non riuscirei mai a seguire una dieta stretta , per iniziare piano piano mi sono autoconvinta di eliminare alcuni cibi gradualmente. Ho iniziato con il formaggio e tutti i dolci ( torte, caramelle, cioccolato, ecc.,) per il momento.
Mia figlia ha perso 3 Kili in un mese eliminando tutti i dolci ... spero che funzionerà anche per me, auguratemi buona fortuna!
Per rimanere sul tema del peso corporeo, ecco un fumetto che ho trovato... a me ha strappato un sorriso. |
| Non salire sopra ... it fa piangere |
Sunday 18 March 2012
Festa in Piazza -- Celebrations in the town square


Sharing a happy moment in our town square!
Un momento di festa nella piazza della mia città!
Friday 16 March 2012
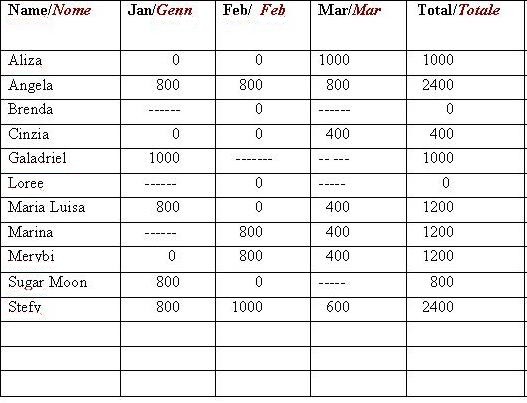
Monthly Game Solution -- Soluzione del Gioco

The game for March is over and here are the two right pairs of penguins that were alike: B and F.
You have all been clever this time, but you must admit it was simple. Below is the list with the names of the winners and points won. I would like to remind you that the first person to guess this game won 1000 points , the second, 800 points and the third, 600 points, all the rest won 400 points each.
Congratulations to :
1st. winner...............Aliza ..............1000 points
2nd " ................Angela........... 800 points
3rd " ................Stefy ............. 600 points
Cinzia, Maria Luisa, Marina and Merybi win 400 points each.
Below this post you can see the updated List of Winners and points.
I will post the next game in the first week of April.
Il gioco per Marzo è chiuso ed ecco la coppia giusta: B e F.
Siete state tutte brave questa volta, ma dovete ammettere che era facile.
Vi ricordo che la prima persona che ha indovinato ha vinto 1000 punti, la seconda, 800 punti e la terza, 600 punti, tutte le altre hanno vinto 400 punti a testa.
Congratulazioni a:
1° .................Aliza .............1000 punti
2° .................Angela .......... 800 punti
3° .................Stefy ............. 600 punti
Cinzia, Maria Luisa, Marina e Merybi vincono 400 punti a testa.
Sotto questo post troverete un'aggiornamento della graduatoria.
Pubblicherò il prossimo gioco nella prima settimana di Aprile.Sotto questo post troverete un'aggiornamento della graduatoria.
Thursday 15 March 2012
Panda Keyring - Panda Portachiavi.

Felt , felt, I love felt! In my point of view it is the easiest fabric to craft with.
Here is another felt keyring I just finished.
This time it's a Panda.
To be honest I made this pattern for an applique but then I thought it would look really cute as a keyring.
Below you can see a resized version of the pattern.
To download the original pattern, click here.
To make this you will need:
Black and white felt.
Black and white embroidery thread.
Batting for stuffing.
Glue.
A keyring or chain.
Print the pattern page. Cut out the pieces .
First glue the eyes and nose pieces on the FRONT piece. With white thread embroider the eyes.
Position the piece marked A over the Front piece as shown in the pattern page and with black embroidery thread stitch around the arm , leg and shoulder part in blanket stitches.
Place the FRONT piece over the BACK piece and use a pin to keep it in place, next blanket stitch all around the Panda with black embroidery thread. Leave a space for stuffing and then close with blanket stitches.
Blanket stitch the ear in place.
Sew the keyring on the back just behind the ears.
Feltro, feltro, amo il feltro! Secondo me è il tessuto più indicato per alcuni progetti di cucito creativo.
Ecco un'altro portachiavi che ho appena finito di cucire.
Questa volta si tratta di un Panda. Se devo essere sincera, ho fatto questo modello per un applique ma poi ho pensato che sarebbe molto carino come portachiavi.
Qui sotto c'è una versione ridimensionata del modello. Per scaricare il modello originale, cliccate qui.
Per fare questo avrete bisogno di:
Feltro (panno lenci) nero e bianco.
Filo da ricamo, nero e bianco
Ovatta per l'imbottitura.
Filo da ricamo, nero e bianco
Ovatta per l'imbottitura.
Colla stick.
Un anello per portachiavi o una catenina.
Stampate il modello. Tagliate i pezzi.
Stampate il modello. Tagliate i pezzi.
Incollate prima gli occhi e il naso sulla parte anteriore (FRONT). Con il filo bianco ricamate gli occhi.
Posizionate il pezzo segnato A alla parte anteriore (FRONT), come illustrato nel disegno e con il filo nero da ricamo cucite intorno al braccio, gamba e spalla in punto festone.
Posizionate la parte anteriore sopra il pezzo posteriore (BACK) e tenetelo in posizione con uno spillo, cucite con punto festone intorno al Panda usando sempre il filo da ricamo nero.
Lasciate uno spazio per l'imbottitura e quindi chiudere con punto festone.
Cucite l'orecchio (EAR) al suo posto con lo stesso punto.
Cucite l'anello per portachiavi sul retro appena dietro le orecchie.

Friday 9 March 2012
Flower Key Ring - Fiore Portachiave
Now that Spring is getting closer I have started crafting again after an idle period that seemed never ending.
I just finished sewing this little flower keyring for a friend, I hope she likes it.
Crafting with felt is one of my favorite hobbies.


I just finished sewing this little flower keyring for a friend, I hope she likes it.
Crafting with felt is one of my favorite hobbies.

Adesso che la primavera s'avvicina, ho ripreso a creare dopo un periodo di inattività che mi sembrava non finire mai.
Ho appena finito di cucire questo fiore/portachiave per una amica, spero che le piacerà.
Lavorare con il feltro è tra i miei passatempi preferiti.

Thursday 8 March 2012
The Lobster Award - Premio Aragosta!

Thank you Doreen for this honour!
This award goes to a few selected bloggers who merit recognition and distinction and to honour those who visit you regularly and who leave a comment on your blog.
This award goes to a few selected bloggers who merit recognition and distinction and to honour those who visit you regularly and who leave a comment on your blog.
All you have to do is...
Proudly copy the Lobster Award logo above on your Blogs and in turn feel inspired and encouraged to nominate others who visit and leave regular messages in your Comments Box.
The rules for the nominations are simple:
1. Nominate someone who regularly visits your Blog and leaves a message in the Comments Box.
2. Tell them about their nomination.
Have FUN with this award and hopefully when it has made its turns, it might just come back to you "on a silver platter"!
Have FUN with this award and hopefully when it has made its turns, it might just come back to you "on a silver platter"!
Grazie Doreen per questo onore!
Questo premio va ad alcuni blogger selezionati che meritano il riconoscimento e la distinzione e a onorare coloro che ci visitano regolarmente e che lasciano sempre un commento sul nostro blog.
Questo premio va ad alcuni blogger selezionati che meritano il riconoscimento e la distinzione e a onorare coloro che ci visitano regolarmente e che lasciano sempre un commento sul nostro blog.
Tutto quello che dovete fare è...
Copiare il logo del premio e pubblicarlo sopra il tuo blog e poi nominare altri bloggers meritevoli che ti visitano e lasciano messaggi regolarmente nella sezione dei commenti.
Le regole per le candidature sono semplici:
1. Nominare qualcuno che regolarmente visita il tuo Blog e lascia un messaggio nella casella commenti.
2. Informalo della loro nomina.
I nominate:
Nomino:
Tuesday 6 March 2012
The art of recycling -- L'arte del Riciclo

I have read so much about recycling that nowadays I can't help but find a new use for old things and old clothing.
I was putting away an old blouse that doesn't fit me anymore when I thought I could do something with the fabric.
I remembered I had an old vintage sewing booklet that belonged to my mum and which explained how to make ruffles and other trimmings so I looked it up and soon I was cutting away strips of nylon fabric from my blouse to make ruffles with.
I cut the fabric into long strips , 1½ inches wide.
I slightly burnt the borders over a tealight candle to avoid the nylon threads from running.
If you do this BE CAREFUL , pass the fabric over the flame very quickly and PAY ATTENTION NOT TO BURN THE FABRIC TOO MUCH . BE CAREFUL NOT TO BURN YOUR FINGERS.
Next I sewed a running stitch in a zig zag pattern all along the strip as shown in the picture below.
In the end I drew up the thread to form the ruffled fans.
Here are some pictures that give an idea of how I made the ruffled trimming and what I used it for.
Check this link for more on fan ruffles:
http://blog.fabric.com/2011/09/who_says_fancy_dress_balls_are.html
Ho letto tanto sull'arte del riciclo che non posso fare a meno di trovare un nuovo uso per le cose e i vestiti vecchi.
Stavo mettendo via una camicetta vecchia, che non mi andava più, quando ho pensato che potevo fare qualcosa con la stoffa.
Mi sono ricordata che avevo un vecchio libretto vintage che era di mia mamma e che spiegava come fare volant e altre rifiniture così l'ho cercato e presto stavo tagliando delle strisce di tessuto di nylon dalla mia camicetta per fare dei volant.
Ho tagliato il tessuto in lunghe strisce, 4cm in larghezza.
Ho bruciato un po' i bordi con una candelina, per fissare i fili della stoffa di nylon.
FATE MOLTA ATTENZIONE se fate questo , bisogna passare il tessuto sopra la fiamma velocemente ... ATTENTI A NON BRUCIARE TROPPO LA STOFFA E ATTENTI ALLE DITA. Poi ho cucito dei punti dritti in un percorso a zig zag lungo tutta la striscia, come mostrato nella foto sotto.
Alla fine ho tirato il filo per formare il volant.
Ecco alcune immagini che danno un'idea di come ho eseguito il tutto e come ho usato il volant.Ecco un link per un' altra idea con questi volant:
http://blog.fabric.com/2011/09/who_says_fancy_dress_balls_are.html
 |
| The vintage booklet that belonged to my mum. --- Il libretto vintage , che era di mia mamma |
 | |||
| This is the page that interested me, with the instructions for making a fan trimming or ruffle. -- Questa è la pagina che mi interessava, per fare il nastro a volant con punti dritti in un percorso a zig zag. |
 | ||
| Slightly burning the edges of the nylon fabric strips. -- Bruciando appena i bordi delle strisce. |
 |
| Burnt edges to stop fabric threads from running --- Ho bruciato i bordi per fissare i fili |
 |
| Before and after result --- Il prima e il dopo |
 |
| I sewed the ruffle on to a plain hand towel --- Ho cucito il volant sopra un piccolo asciugamano. |
Thursday 1 March 2012
It is Game Time! --- E' Tempo di giocare!
Yes, it is game time once more. This time I found a VERY easy game for you.
This one was really meant to test kids' sense of observation so you HAVE TO GUESS this one!
IMPORTANT - PLEASE READ
As you already know, the first person to guess right will gain 1000 points.
As this is an easy one, the second person to guess right will gain 800 points and the third one will gain 600 points , all the others that follow will gain 400 points each.
The time of arrival of your comments ( right answer) will help me to judge the 1st, 2nd and 3rd places.
The game closes on March 15, 2012.
I think this is all so let's start playing! Good Luck!
Si, è tempo di giocare di nuovo. Questa volta ho trovato un gioco MOLTO facile per voi.
Questo gioco , in realtà, era destinato a testare il senso di osservazione nei ragazzini, perciò , DOVETE INDOVINARE QUESTA VOLTA!IMPORTANTE - LEGGETE PER FAVORE
Come già sapete, la prima persona che indovinerà correttamente guadagnerà 1000 punti.
Visto che il gioco è facile, la seconda persona che indovinerà guadagnerà 800 punti e la terza guadagnerà 600 punti, tutte le altre che seguiranno dopo, guadagneranno 400 punti ciascuna.
L'ordine d'arrivo, 1°, 2° e 3°, sarà secondo l'ora d'arrivo dei vostri commenti ( risposte esatte).
Il gioco scade il giorno 15 Marzo 2012.
Penso che ho detto tutto , allora cominciamo a giocare! In bocca al Lupo!Il gioco scade il giorno 15 Marzo 2012.

Subscribe to:
Posts (Atom)
LinkWithin
